Four years of using a custom-built small form factor desktop PC
For the past four years, I have been using a desktop PC I have custom-built to my own needs. One of its key features is that it combines high-end computing power with a small form factor (SFF). My motivation to write this post came from a recent online discussion I participated in, where someone not familiar with SFF PCs tried to convince me (and others) that SFF PCs are bound to overheat. As a long-time user of an SFF PC, I can safely say this is not true and it such FUD needs to be dismissed. I also want to share my experiences of building a small form factor desktop PC, so that those of you interested in doing an SFF build know where the challenges lie.
A bit of personal history
The last time I built a desktop PC was back in 2006. It was an Athlon 64-based platform. A distinguishing feature of my build was the case. I went for a Chieftec Dragon mid-tower, made of thick aluminium and weighing 8kg. I thought of it as a once-in-a-lifetime investment, just like a Parker pen. I was not entirely wrong. The case still serves for my mum’s PC, though the internals have long been replaced.
In 2011, I rented a small studio flat and started living on my own. I no longer had the space for a large desktop PC and have switched to using a laptop. Compared to a desktop, usability was quite bad, but I appreciated the mobility.
In the second half of 2019 I was thinking of getting a new computer. The release of Cyberpunk 2077 was approaching fast, and I was planning to get a proper gaming PC just in time for the premiere. (It would also be the first time in my life to even have a gaming PC.) I was also quite tired of having to work on laptops - the ergonomics were proving to be very bad for my health. As a quick stop-gap solution, towards the end of 2019, I bought an external keyboard and a 23" LCD and used both with my laptop. Having worked with them for a couple of days, it was settled: I am going back to having a proper desktop PC. No more struggling with laptop ergonomics.
That was late 2019. In early 2020, COVID happened. Cyberpunk 2077 was delayed a couple of months, initially to September. However, seeing how the pandemic wreaks havoc in the electronic supply chains, in March I decided to proceed with the plan of building a desktop PC. As you’ll see in a moment, it was already a bit too late.
Deciding on a small form factor build
When the “small form factor” term comes around, some of you might think of one of the mini computers, such as the Intel NUC or HP Elite. That wouldn’t be entirely wrong - these count as SFF desktops - but what I mean by SFF are small desktop cases produced for PC enthusiasts. I was sold on the idea of a small form factor PC by a friend of mine, who built his desktop in a Dan A4-SFX. It is one of the best SFF cases on the market with dimensions of 20cm x 12cm x 32cm and just 7.2L of volume. With such a small size, my friend just treats his computer as a portable PC for game jams.
Don’t be fooled by the small dimensions. As you’ll see, these PCs can fit the most powerful CPUs and GPUs. In fact, the best SFF cases are produced in small numbers for enthusiasts who want to get the best possible performance, while keeping their PC small.
From the beginning, I liked the idea of having a PC that’s actually small enough to fit on my desk. I still had the memory of that huge Chieftec Dragon case and how I struggled to fit it under the table. I’ve seen my friend’s PC in action and envied how small it was. And so I decided to go with an SFF build.
I was planning on building a PC that is suitable for both gaming and work. For gaming, I wanted an RTX card - these came to the market just a few months prior. For work, I wanted a CPU with as many cores as possible. My major use case is program compilation, and that’s when many cores definitely pay off.
Selecting the components
Having figured out my use cases and requirements, I was in for a lot of research. One thing I quickly learned is that building a small form factor PC is a bit like solving a puzzle. It is certainly an art of compromises, as one cannot just put any components into the case.
The first choice to make was crucial: AMD or Intel? In the past, I had experiences with both. While I still fondly remember my Xeon-based laptop, I try not to take any sympathies with any of the companies and just pick the best product. In 2020, it was certainly AMD, which made a spectacular comeback after years of falling behind Intel. I decided to go for a Ryzen 9 3900X, a 12-core/24-thread CPU whose multiple cores would allow me to speed up my most common use case - code compilation. Intel had practically nothing comparable to offer, and getting an AMD was an obvious choice.
Once the platform was decided, it was time for the motherboard. The majority of small form factor cases will only fit mini-ITX motherboards, which are 17cm by 17cm. These will have just one PCIe expansion slot and one pair of RAM slots. Luckily, these are the only compromises one needs to make. Other than that, mini-ITX boards can be as performant and feature-rich as their full-sized ATX counterparts. I was planning to get a motherboard based on either B450 or X470 chipset, but I was out of luck as all such motherboards have sold out by April 2020, and it didn’t seem like they are coming back in stock anytime soon. As an act of desperation, I had to get a ROG Crosshair VIII Impact. It is a high-end motherboard based on the X570 chipset, designed with overlocking in mind. Unfortunately, for this reason it is quite expensive, about a double of what I had originally intended to pay for a motherboard. As a bonus problem, Crosshair VIII Impact has a mini-DTX format instead of mini-ITX. This means an additional 3 centimetres in length, making it 20x17cm instead of 17x17cm, and impossible to fit in most SFF cases.
Luckily for me, by that time I have already decided on the NCase M1. With dimensions of 33cm x 16cm x 24cm and a total volume o 12.7 litres, it is larger than many SFF cases. It also can fit a mini-DTX board. I remember my wife having serious doubts about the M1 due to its price - it had to be imported from Taiwan, adding even further to the costs - but once she saw how well the M1 is made and how modular it is, she agreed it was absolutely worth the money.
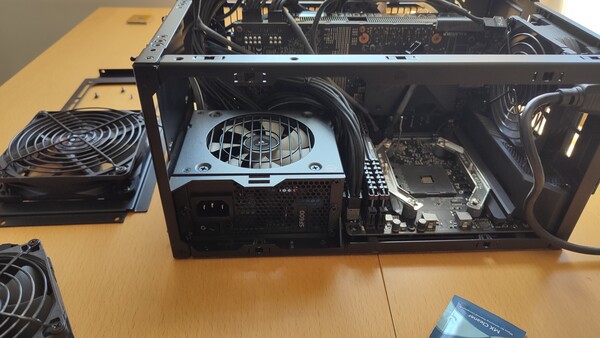
Next, the power supply unit (PSU). SFF PCs typically use PSUs in the SFX format, a smaller variant of the typical ATX format. Choosing a power supply was a no-brainer - Corsair offers the best SFX power supplies on the market. One really nice feature they have is modularity: cables that are not needed can be disconnected from the power supply, instead of dangling inside the case. Unfortunately, pandemic once again proved to be a pain. I was planning to get a 750W PSU, but the only one I could source was a 600W one. Luckily, 600 Watt was enough for my build.
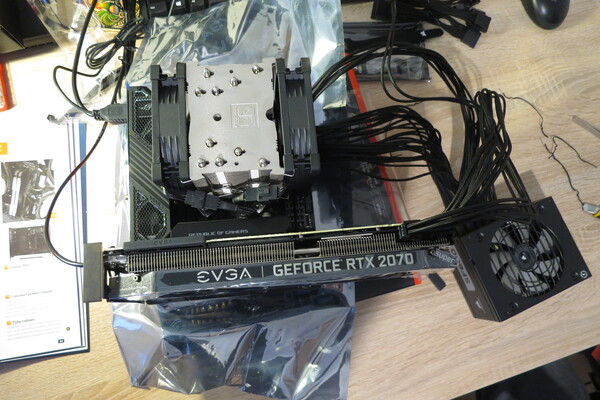
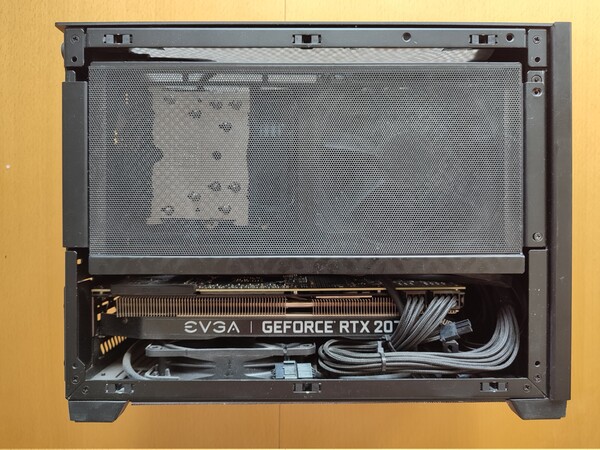
Finally, the graphics card. When it comes to building an SFF computer, GPU compatibility is something that needs to be taken into account. Graphics cards have got quite large these days, often taking as much as three expansion slots and having three fans on the radiator. Many of the largest cards will not fit into an SFF computer1. I had to take those limitations into account and ultimately decided on the EVGA GeForce RTX 2070 Super Black Gaming2, a 2-fan 2-slot card that fits perfectly in the M1. Interestingly, I was able to get the GPU just fine - major shortages didn’t happen until the second half of 2020.
Aside from that, I decided on 16GB of RAM memory (Corsair Vengence LPX) and Seagate FireCuda 510 2TB NVMe drive.
Cooling
Figuring out the cooling is a whole separate subject. This is one thing that needs to be done right with an SFF build.
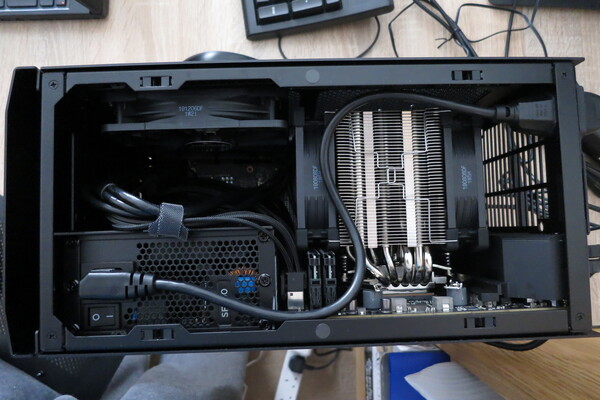
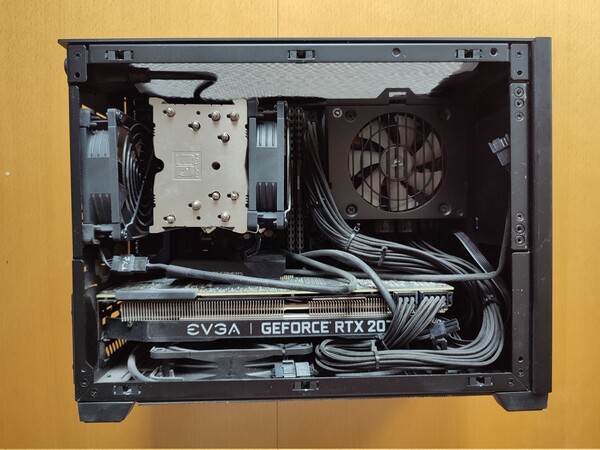
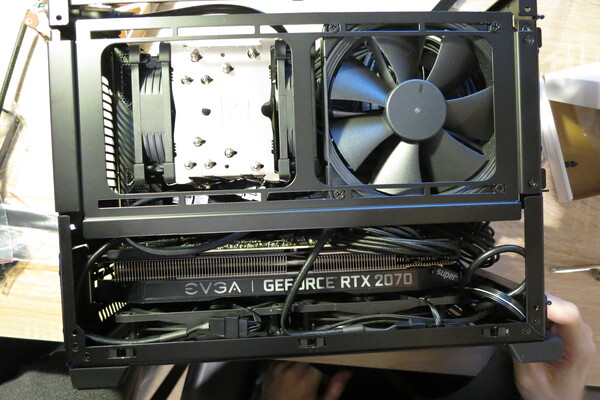
SFF cases tend to have quite strict limitations on CPU cooler height, though the M1 is generous in that regard. After considering my options I decided on the Noctua NH-U9S radiator with two 92mm NF-A9 fans working as the exhaust. I also mounted a 120mm intake fan on the side bracket. The plan was to have the side fan pull air into the case, and the CPU fans exhaust it at the back. This was the starting point, but it needs a few words of comment.
Firstly, having two fans on the cooler proved to be inconvenient when removing the cooler from the CPU. I didn’t think this would be a problem since I wasn’t planning to take off the cooler once the PC was assembled. However, I ended up assembing and disassembling the computer several times. In the end I decided to remove the rear fan from the CPU cooler and attach it to a dedicated place at the back of the case. Cooling works essentially the same, but disassembling the CPU cooler is now a lot easier.
Secondly, I’ve run into unexpected problems with the GPU. The graphics card I picked had a semi-passive cooling, meaning the fans only turn on once the temperature reaches 55C. This looks like a great idea on paper, but its execution is flawed. It turns out that during regular desktop work card’s temperature oscilates around the 55C mark, resulting in fans constantly turning on and off. I probably wouldn’t have noticed if it wasn’t for a loud, audiable click every time the fans start or stop, i.e. every 10 seconds. Sadly, the card BIOS isn’t smart enough to spot such situations and just keep the fans on. A solution was to mount extra fans underneath the card. M1 allows to mount two fans at the bottom of the case, which I did. Of course, any extra fans under the GPU defeat the purpose of passive cooling on the card.
Now, let’s talk about the fans. Last time I assembled a PC back in 2006 the go-to brand when one wanted the best fans was Akasa. Indeed, they were great. Quiet and extremely durable - the ones I got in 2006 still work without any audiable buzz. Apparently, things have changed since then and in 2020 the brand everyone recommends is Noctua. Because of that universal apprisal I decided to go with Noctua fans. Unfortunatelly, despite good opinions, Noctua fans turned out to be a major disappointment. I expect three qualities from a fan: it needs to be effective, quiet, and durable. Noctua manages with the first and third requirement, but not with the second one. I would expect that the only noise comming from a fan is the hum of the air going through it. However, most of the Noctua fans I bought emit a buzz and sometimes also vibrations (despite rubber anti-vibration pads).
I initially started with five fans installed inside the case - two on the CPU, two under the GPU, one on the side. Most of them would be faulty and buzz. I went through several returns, RMAs, and experiments with different models (Chromax, Redux). I had around a total of 10-12 Noctua fans go through my hands before I finally found ones that weren’t buzzing. I also gave up on the idea of two fans under the GPU. I couldn’t find the fifth fan that didn’t buzz and it turned out that a single fan is enought to keep the GPU at 40C during standard desktop work.
I admit that the four fans I settled on have been working fine for the past four years without any problems, but the fact that majority of the fans I bought were deffective is simply unacceptable. With such experience I can safely say that Noctua fans are utter garbage and I don’t recommend them to anyone. I won’t even mention the questionable colour choice Noctua has made with their fans - luckily, there’s the Noctua Chromax line, which offers black fans.
Lastly, some people might want to consider liquid cooling. The NCase M1 is designed for that, as are most SFF cases. The side bracket in the M1 allows to mount a radiator with two 120mm fans, while at the back are two holes for those wanting a custom liquid cooling loop connected to an external reservoir. The reason why I didn’t go for water cooling was the uncertainty surrounding the Linux support of water coolers. Back in 2020 there was no official Linux software to control the water pumps. (Have things changed in 2024? Somehow, I doubt it.) I didn’t want to end up with cooling that doesn’t work as intended and decided to stick to the traditional air cooling.
The build
Here are some photos from the build process:
Temperatures
The first thing I did after finishing the build was running the benchmarks, to stress-test both the CPU (using Prime95) and the GPU (using Furmark). With CPU, I was able to heat it up to about 90C, while benchmarking GPU yielded a 76C temperature. However, these results differ from temperatures obtained during daily usage.
The CPU’s idle temperature was originally around 44-45C, though over the years it would slightly rise to around 48-49C. I presume this is due to thermal paste deterioration. During daily usage, I found it extremely difficult to heat the CPU past the 70C mark, even if compiling on all cores for a longer period of time. Note that I have disabled Core Performance Boost in the BIOS. Core Performance Boost is like a factory CPU overlock. Disabling it results in lowering the CPU voltage from 1.4V to 1.0V and thus lowering the idle temperatures noticeably. This comes at a marginal loss of computing power, which is something I am willing to accept for a noticeable reduction in power consumption, thermals, and fan noise.
The GPU’s idle temperature with one fan underneath it typically sits at around 40C, with a power draw of about 20 Watts. These numbers are for Linux. Interestingly, on Windows the GPU idle temperatures are closer to the 55C mark, resulting in fans repeatedly going on and off. When playing games, the highest temperature I got was 80C in Metro: Exodus. This is higher than in the benchmarks, suggesting that Furmark might not be able to fully saturate the card.
Upgrades
One thing I always had at the back of my head when building a PC are the upgrade options. From experience, I know it is quite difficult to predict the future upgradability of the assembled configuration. That being said, for this particular build things have gone well since I already upgraded the RAM, the CPU and the GPU.
In early 2022, I upgraded the original 16GB of RAM to 32GB. This was motivated by requirements of Nix and is something I intend to write about on the blog. The tricky bit with this upgrade is that the DDR4 memory these days comes in pairs of modules. However, small motherboards used in SFF computers have only two RAM slots. As a result, it is not possible to simply add more memory. Therefore, when upgrading RAM, I had to remove and replace existing memory, which left me with a pair of unneeded memory modules that I had to sell.
Earlier this year, I decided to upgrade both the CPU and the GPU. I swapped the 3900X with a Ryzen 9 5950X, which is a 16-core/32-thread CPU. The 5950X has the same TDP (thermal design power = amount of emitted heat) as the old 3900X, which means no modification to the existing cooling was needed. After the upgrade, I noticed a decrease in CPU temperatures, but I don’t know whether this is due to better thermal performance of the new CPU or just because of new thermal paste.
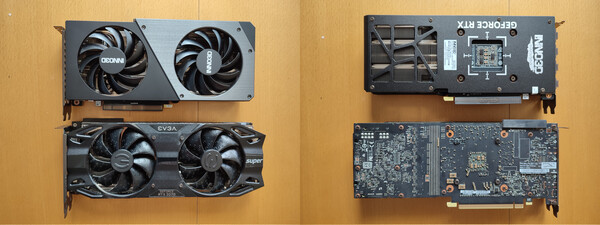
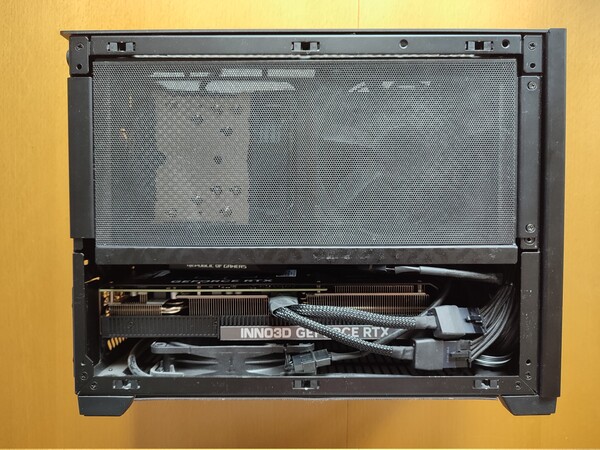
As for the GPU, I went for Inno3D GeForce RTX 4070 Super Twin X2. I built my PC in the first half of 2020, and in September of that year, nVidia released the RTX 30xx series. The 30xx cards were noticeably larger and would no longer fit the M1. I was concerned that I won’t be able to upgrade the GPU without replacing the case, but luckily with the RTX 40xx series, nVidia has done a great job at minimizing the cards. The new RTX 4070 Super is smaller and draws roughly the same amount of power, while being several times more powerful than the 2070 Super - I am truly impressed with what nVidia have achieved here. At the same time, the 4070 Supers are quite affordable, certainly a lot cheaper than what I paid for the 2070 Super in 2020. The only real downside is the new GPU power connector, the infamous 12VHPWR, which is a major pain. It lacks flexibility and getting the side panel to close after installing the new card was a challenge.
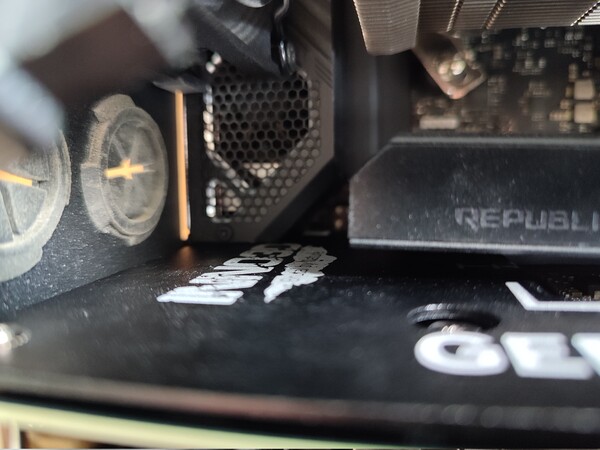
I have also run into an unexpected compatibility issue between the new card and the motherboard. The 4070 Super has a backplate and the card would not fit into the PCIe slot due to collision with the cooling block at the back of the motherboard. The solution was to remove one of the screws holding the backplate - this resulted in an extra 0.5mm of space, which was enough to fit the new card.
Final thoughts
After 4 years of using an SFF PC, I couldn’t be more happy with it. With a 16C/32T CPU and 32GB of RAM, it has all the computing power I need for work, while a powerful GPU makes it also a high-end gaming PC. I never had any problems with the temperatures, which are at a level comparable with a standard PC. The single most important part of this success is the NCase M1. It is small enough not to be a problem when standing on the desk. At the same time, it has all the space needed to fit the components and provide them with proper cooling. I am also very happy about the upgradability of the whole build.
This was my first SFF build, and it took a lot of research. I started thinking about the new PC sometime in March 2020, and the build was ultimately finished in July. Most of that time was spent waiting for a 750W power supply that never arrived. Another 3 weeks went wasted because of the motherboard failure. The one I originally got, died after a week. I had to disassemble the whole computer, RMA the motherboard, wait for a replacement, and assemble everything again.
Building a PC during the pandemic was also quite a challenge. I ended up getting parts that I didn’t exactly want, but in the end I am not complaining. The Crosshair VIII Impact motherboard proved to be a decent platform for future upgrades, while the 600W power supply is, quite surprisingly, enough to power both the new CPU and the new GPU.
The whole process of building my own SFF PC was greatly aided by the OptimumTech channel on YouTube. This is a treasure trove of knowledge and I highly recommend you check it out if you decide to make your own SFF build. Note that here I have only focused on my own experiences and haven’t talked about SFF builds in general. In particular, I haven’t even mentioned sandwich layouts, i.e. mounting the GPU parallel to the motherboard using a riser cable, instead of inserting the GPU into a PCIe slot. So, if you want to learn about that, OptimumTech’s channel is the place to go.
This post has got a lot longer than I initially intended. I plan to follow it up with two more posts. One will be about the AMD’s AM4 platform and its stability issues, while the other about being an early RTX adopter.
SFF cases have progressed noticeably since 2020 and are much better at space management. For example, the successor of my M1 case, NCase M2, fits the majority of GPUs on the market. Still, there are some large cards that it will not fit.↩︎
Sadly, in September 2022 EVGA decided to withdraw from the GPU market, the supposed reason being difficult partnership with nVidia.↩︎
